MCP(Model Context Protocol)는 LLM(예: Claude, GPT)과 다양한 도구(파일 시스템, 데이터베이스, API 등)를 연결하는 클라이언트-서버 프로토콜입니다. 이번 글에서는 MCP Client를 구현하여 파일 시스템 기반 MCP 서버와 통신하는 방법을 다룹니다. 프로젝트 구조부터 설정 파일, Python 코드 예제까지 단계별로 설명하니, 직접 MCP 클라이언트를 테스트해보고 싶은 분들에게 유용할 것입니다.
📂 1. MCP란 무엇인가?
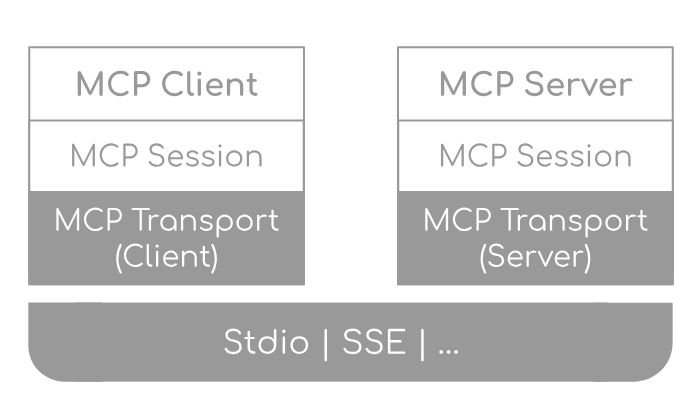
MCP는 JSON-RPC 2.0 스타일을 기반으로 한 클라이언트-서버 프로토콜로, 다음과 같은 구조를 가집니다.
- MCP 서버: 특정 기능(도구)을 제공하고, MCP 메시지를 받아 처리합니다.
- 예: 파일 시스템 접근, 데이터 쿼리, HTTP 호출 등.
- MCP 클라이언트: MCP 서버에 요청을 보내고 응답을 받아 작업을 수행합니다.
이를 통해 확장성과 호환성이 뛰어난 시스템을 구축할 수 있습니다.
🏗️ 2. 프로젝트 구조 및 준비
📌 디렉토리 구조
프로젝트 구조는 아래와 같습니다.
mcp-client/
 ┣ .venv/                   # 가상환경(uv venv)
 ┣ mcp_server_config.json   # MCP 서버 설정 파일(파일 시스템 서버)
 ┣ client.py                # MCP 클라이언트 코드
 ┗ ...
📌 가상환경 및 MCP 설치
uv 패키지 관리자를 사용하여 가상환경을 설정하고 MCP 패키지를 설치합니다.
uv init mcp-client
cd mcp-client
uv venv
source .venv/bin/activate  # (Windows: .venv\Scripts\activate)
uv add mcp
이제 **MCP 서버 설정 파일(mcp_server_config.json)**과 **클라이언트 코드(client.py)**를 작성할 준비가 되었습니다.
⚙️ 3. mcp_server_config.json 설정
MCP 서버 실행을 위한 설정을 JSON 파일로 관리합니다.
{
  "mcpServers": {
    "filesystem": {
      "command": "npx",
      "args": [
        "-y",
        "@modelcontextprotocol/server-filesystem",
        "."
      ]
    }
  }
}
📌 설정 요소
- mcpServers: MCP 서버 목록을 정의합니다.
- command: MCP 서버를 실행하는 명령어(npx, python 등).
- args: 실행 시 전달할 인자(매개변수).
위 설정을 통해 파일 시스템 MCP 서버를 실행할 수 있습니다.
📝 4. 클라이언트 코드 구현
📌 4.1 모듈 임포트
먼저, 필요한 Python 모듈을 불러옵니다.
import json, os, asyncio
from contextlib import AsyncExitStack
from mcp import ClientSession, StdioServerParameters
from mcp.client.stdio import stdio_client
📌 4.2 서버 설정 읽기
설정 파일에서 MCP 서버 실행 정보를 불러옵니다.
async def main():
    with open("mcp_server_config.json") as f:
        config = json.load(f)["mcpServers"]["filesystem"]

    server_params = StdioServerParameters(
        command=config["command"],
        args=config["args"],
        env=None
    )
📌 4.3 MCP 서버 실행 및 세션 초기화
    stack = AsyncExitStack()
    async with stack:
        stdio, write = await stack.enter_async_context(stdio_client(server_params))
        session = await stack.enter_async_context(ClientSession(stdio, write))
        await session.initialize()
📌 4.4 MCP 도구 목록 조회
        tools_response = await session.list_tools()
        tool_names = [tool.name for tool in tools_response.tools]
        print("도구:", ", ".join(tool_names))
MCP 서버가 제공하는 도구 리스트를 가져와 출력합니다.
📌 4.5 허용된 디렉토리 목록 조회
        allowed_response = await session.call_tool("list_allowed_directories")
        allowed_text = allowed_response.content[0].text

        directories = [line.strip() for line in allowed_text.split('\n') if line.strip()]
        if not directories:
            directories = ['.']

        print(f"디렉토리: {', '.join(directories)}")
서버에서 접근 가능한 디렉토리를 조회합니다.
📌 4.6 특정 확장자 파일 목록 조회
        extensions = ['.txt', '.md', '.py', '.json', '.csv', '.log']

        for directory in directories:
            print(f"\n--- {directory} ---")

            dir_response = await session.call_tool("list_directory", {"path": directory})
            dir_text = dir_response.content[0].text

            text_files = [line.replace('[FILE]', '').strip() for line in dir_text.split('\n')
                          if line.startswith('[FILE]') and any(line.endswith(ext) for ext in extensions)]

            print(f"{len(text_files)}개 파일: {', '.join(text_files[:3])}" +
                 ("..." if len(text_files) > 3 else ""))
지정한 확장자(.txt, .md, .py 등)를 가진 파일 목록을 필터링합니다.
📌 4.7 파일 내용 읽기 및 출력
            for filename in text_files[:2]:  # 최대 2개 파일만 읽기
                try:
                    file_path = os.path.join(directory, filename)
                    file_response = await session.call_tool("read_file", {"path": file_path})
                    content = file_response.content[0].text
                    lines = content.split('\n')

                    print(f"\n> {filename}:")
                    for i in range(min(3, len(lines))):
                        print(f"  {lines[i]}")

                    if len(lines) > 3:
                        print("  ...")
                except:
                    print(f"오류: {filename} 읽기 실패")
파일을 읽고 처음 3줄을 출력합니다.
🚀 5. 실행 및 예시 출력
📌 코드 실행
if __name__ == "__main__":
    asyncio.run(main())
위 코드를 실행하면 MCP 서버와 통신하여 파일 시스템 정보를 가져올 수 있습니다.
📌 예시 출력
도구: list_allowed_directories, list_directory, read_file, ...
디렉토리: ./data, ./logs

--- ./data ---
2개 파일: notes.txt, report.json

> notes.txt:
  프로젝트 개요
  MCP 클라이언트 테스트
  ...

> report.json:
  {
    "summary": "테스트 리포트",
    ...
  }
이번 글에서는 MCP Client를 구현하여 파일 시스템 MCP 서버와 연결하는 방법을 다뤘습니다.
✅ MCP란 무엇인지 이해
✅ 서버 설정 파일(JSON) 작성
✅ Python 코드로 MCP 서버와 통신
✅ 디렉토리 및 파일 조회 및 내용 출력
이를 통해 LLM과 외부 도구를 연결하는 MCP의 기본 개념을 이해하고, 실제 데이터를 다룰 수 있는 Python 클라이언트를 작성할 수 있습니다.
MCP를 활용하면 AI 시스템과 다양한 툴을 연결하는 강력한 기능을 구현할 수 있으니, 직접 실행해보고 확장해보세요! 🚀
https://modelcontextprotocol.io/quickstart/client
For Client Developers - Model Context Protocol
If you’re continuing the weather tutorial from the server quickstart, your command might look something like this: python client.py .../quickstart-resources/weather-server-python/weather.py
modelcontextprotocol.io

'인공지능' 카테고리의 다른 글
| LLM 평가(Evals)의 중요성과 효과적인 평가 방법 (0) | 2025.04.04 |
|---|---|
| AI 코드 생성의 게임 체인저: Cursor의 새로운 '프로젝트 규칙' 기능 (0) | 2025.04.04 |
| Cursor 활용 최적화: 고급 프롬프트 기법과 AI 도구 통합 전략 (0) | 2025.04.03 |
| Awesome MCP Servers - AI 모델 확장을 위한 최고의 MCP 서버 모음 (0) | 2025.04.03 |
| 대규모 언어 모델(Large Language Model) 기반 에이전트의 개념과 연구 동향 (0) | 2025.04.03 |


